SDRSharp - Tips and Tricks For The Beginner.
What you need to know:
- Make sure you have everything connected
- Top left: Airplanes are AM, Human voice is NFM, Music is WFM
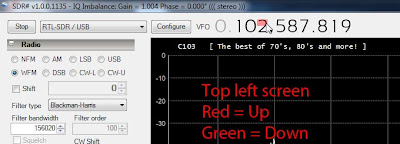
- Top middle numbers: red is up, blue is down, scroll with mouse changes frequency on the number quickly
- Increase power / sensitivity in Configuration (top middle).
SDRSharp will work IF:
- You have Microsoft .NET installed
- You have the necessary drivers (Zadig takes care of that)
- The RTL stick is connected to your computer.
You receive radio signals if you have an antenna connected to the RTL stick.
Please read the Installation Guide, with instructions you will be up and running in 15 minutes.
Connect the RTL stick to the USB port, then start SDRSharp with the shortcut.
- You have to use the USB port used for installation.
- You have to start SDRSharp as an administrator (see the end of the software installation guide).
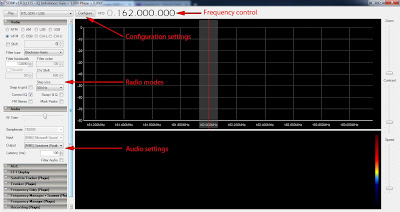
Start screen - what's what

Starting from the top left corner:
Play button - starts the sound / runs the software.
RTL-SDR / USB - select this for RTL stick.
Configure - how much signal you want.
Don't touch for now. See at the bottom of this document.
Long Numbers - you set the frequency here.
Radio- Mode settings
NFM is needed for AIS and speech,
AM is for shortwave radio and airplane chat,
WFM is for listening to commercial radio and weather Fax reception.
Don't touch the others. You do not need them at this stage.
Window with red line, surrounded by gray area - the red line is the center of the frequency you adjust with the numbers.
The gray area indicates the amount of signals you receive.
Window below red line - this is called a waterfall, shows you signals over time.
Moving down, next window is:
Audio - AF gain is volume control. Makes the audio louder or quieter.
Output: you want to hear the signal - select Speakers
use signals in another software - select CABLE Input - this sends the signal to other software.
Now press Play in the top left corner.
Congratulations, you started your software defined radio!Magic awaits :-)
You will get the following screen, see the picture to identify where is what:
(Click on the picture to see it large)
The mountain in the middle is the signal. The height of the mountain is called signal strength, the width of the mountain is called the bandwidth. The better the signal, the higher it is, and the more you can hear it.
The area of the gray is called the bandwidth - width of the mountain. You can change it by going to the edge of the gray and pushing the left button on the mouse, then moving left and right (keep the left mouse button pressed down to move the gray area).
Some signals are only a small peak, some are like Mount Everest.
Remember: the higher the mountain - better the signal.
If you know the area under the gray, you can enter manually in the radio panel.
When you change the width on the right, the numbers change in the left, and the other way around.
Useful numbers:
People talking (Marine channels, taxi): 12500 (12.5 kHz, k=100)
AIS signal: 25000 ( you see the width when you adjust the gray area)
If you do not know the number, you see the signal, and see how wide it is.
Then you can adjust with mouse left click down until the colours are under the gray area.
Changing frequency
- Go to the long numbers at the top of the screen, so when you move your mouse, the number under the pointer will turn either blue (down) or red (up).You can click, or use the wheel (the middle stuff between left and right click) to change the frequency you want to hear.
- You may use the direct frequency entry, it is on the left called "Frequency Entry (Plugin)"
Adjusting the power of the stick / adjusting sensitivity
If you can't hear it, you need to make it louder. You can adjust the power of the RTL stick (sensitivity) by going to Configure (top left, left to the numbers) and moving the slider left and right.
Configuration slider - Move to the right - more signals, more to hear.
If the top of the mountain touches the top of the screen you have too much power, move the slider to the left.
So for now you know what to do:
- Change frequencies
- Experiment with different modes
- Tune across the spectrum.
- Use the sliders on the right hand side of the screen:
If you enjoyed this article, or wish to support this blog,
... go to Amazon and buy my book. Tips and tricks in the book will save time and money, reduce frustration with computer settings and help you build the best antenna system from shortwave to microwave. Detailed and illustrated step-by-step descriptions on easy-to-do antennas, from shortwave to microwave.
Basically all you need to know to enjoy radio.


No comments:
Post a Comment